
Inside a Modular Packaging System
About this practice test
A reading task about the stations in a compact modular packaging system and how their positions and functions fit together.
What you’ll practice
Finding detail
Locate specific information and evidence.
Interpreting ideas
Connect main points and inferences.
Evaluating arguments
Assess claims, evidence, and limitations.
What to expect:
1 question with explanations to review after submission.
Study the questions and tasks
Work through the material below, or start the interactive practice above to complete an attempt. Try the exercises before opening any answer or transcript sections, then use them to review your work.
- Practice level
- B2. Try this level if you can follow the instructions and understand most of the language; choose an earlier level if you need more support.
- Question formats
- Label the image
How to approach this practice
Read the passage for its main idea, then return to the relevant sentence or paragraph for each question. Base answers on the passage.
Inside a Modular Packaging System
 region-1
region-2
region-3
region-4
region-5
region-6
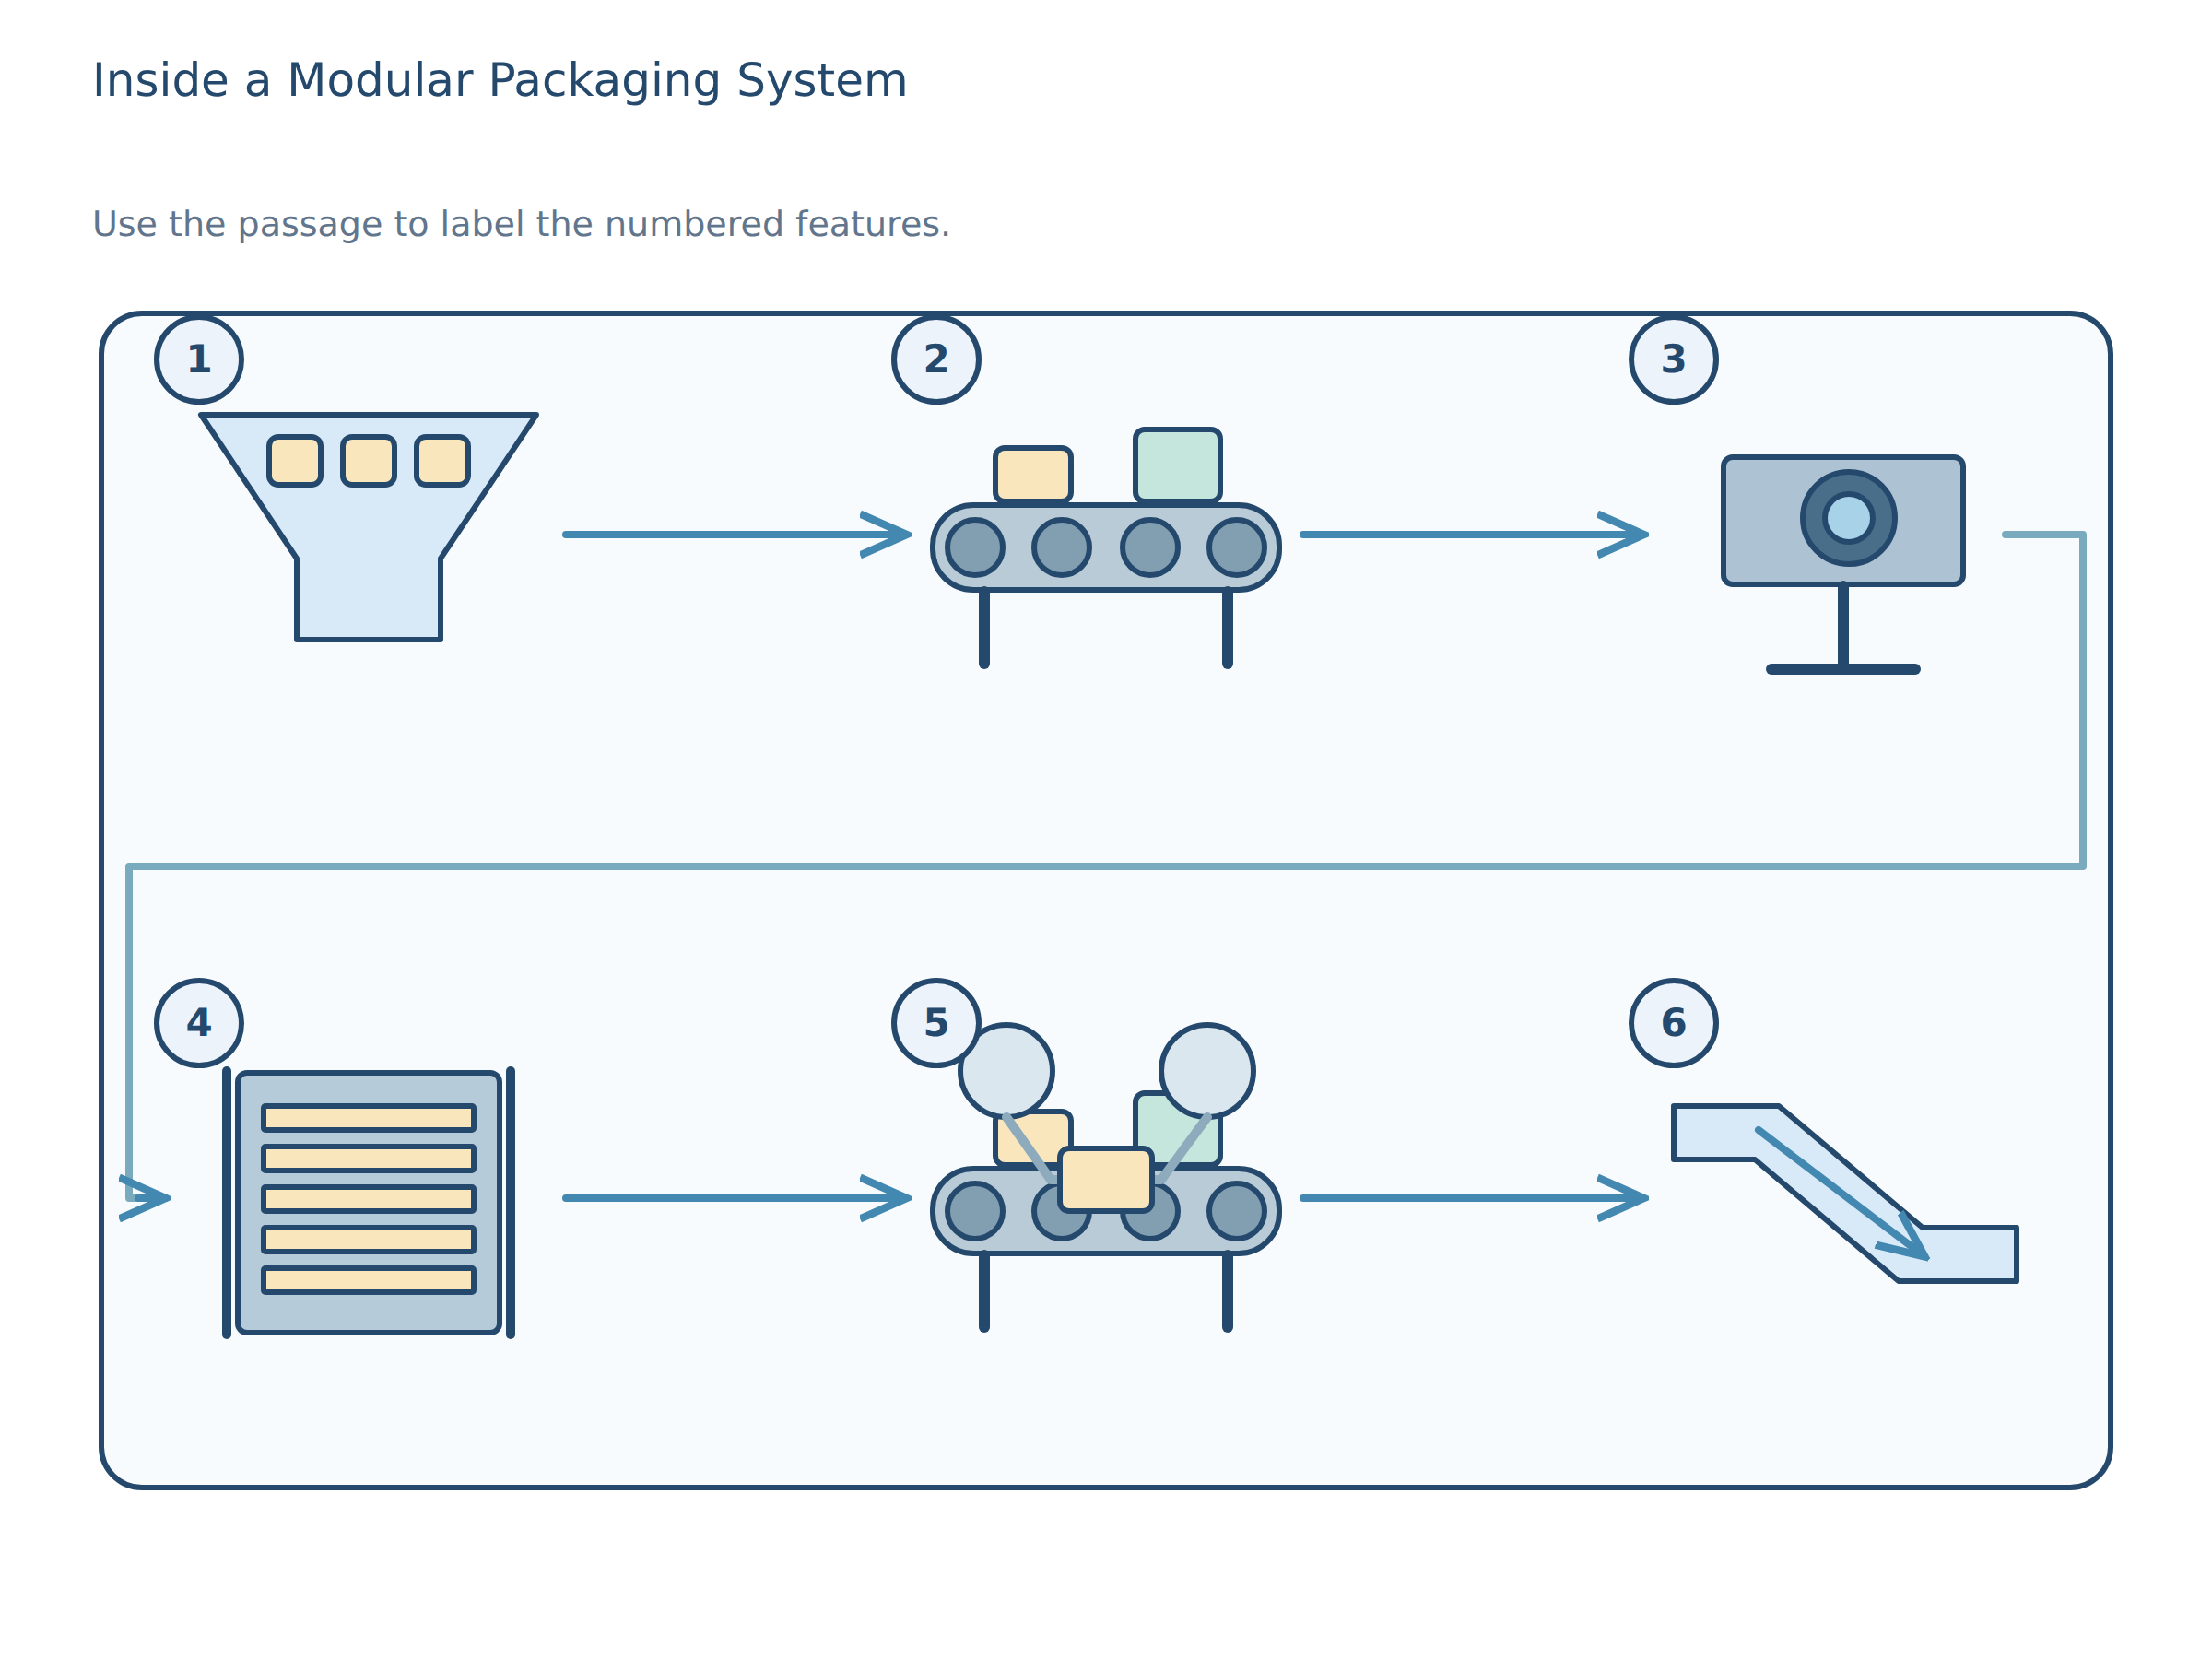
In the training room at North Quay Plastics, a modular packaging system sits on a frame the size of a narrow table. It is designed for light household items such as refill sachets and folded leaflets, so the line is compact rather than industrial in scale. Instead of one long machine that does everything in one place, the system breaks the work into separate stages. That matters because each stage can be replaced or bypassed when a client changes the pack size, which is the main reason the company uses this design. The frame is easy to roll between benches, and the modules are mounted so a technician can swap one station without moving the others. At the upper left, the intake hopper receives loose packets from a tote and releases them at a steady rate. It is not a storage bin for long periods; its job is to prevent the next module from being starved or flooded. Directly beside it, in the upper centre, the alignment belt separates overlapping items and turns each one so that its printed face points forward. A small side rail keeps the packets from drifting while they are being squared, which helps prepare them for the next step. In practice, this means the system can handle a mixed bundle of packets without needing a person to sort each one by hand. At the upper right, a small inspection camera checks barcodes and seal lines. It does not reject every imperfect unit; instead it flags anything that falls outside the tolerance set by the operator. The camera is useful because a fault caught here is cheaper to correct than a fault discovered after packing, but it cannot repair damage already done. If the print is blurred or a corner is torn, the module only sends a warning, showing both the value and the limits of automatic checking. A supervisor can then decide whether to divert the item, rework it, or let it pass if the defect is minor. The lower left contains a buffer magazine that holds a short reserve of empty sleeves. If delivery lags, the magazine keeps the line moving for a minute or two, so short interruptions do not immediately stop production. The lower centre is the wrapping head, where a measured sleeve folds around the product and a heated strip closes the seam. This module can be swapped for a paper bander when clients want less plastic, but the change slows the line and is not suitable for items that need a tight moisture barrier, so the alternative is useful only in some situations. That trade-off matters because the company does not choose one material for every order; it chooses the least wasteful option that still protects the contents. Once sealed, packs slide to the lower right dispatch chute, which lowers them onto a tray or into a shipping crate. Because the chute is angled rather than vertical, fragile packs are less likely to bounce. Yet the chute cannot solve a poorly prepared product; if earlier modules misalign the item, the final drop only preserves the mistake. In other words, the last station finishes the process, but it cannot correct errors made earlier. This is why technicians watch the line as a sequence rather than as isolated stations. What makes the system useful is not that every module is clever on its own, but that each one can be replaced without redesigning the whole line. A manager can add a printer, remove the inspection camera, or widen the buffer magazine when orders change. That flexibility is why the diagram shows the stations separately: the value of the system lies in the way the parts cooperate, and in the fact that they fail in different ways. The passage explains these stations so the reader can connect the written description to the diagram and see how a modular design works in practice.
-
Question 1 · Label the image
Match the labels to the marked regions of the image.
Read the passage and choose the correct labels for the six unlabeled positions of the diagram.
Return to the passage, recording or visualImage labels
alignment belt · inspection camera · buffer magazine · wrapping head · dispatch chute · cooling fan · control panel · intake hopper
Label regions region-1, region-2, region-3, region-4, region-5, region-6 marked on the image above.
Check answers and explanations
- Region region-1
- intake hopper
- Region region-2
- alignment belt
- Region region-3
- inspection camera
- Region region-4
- buffer magazine
- Region region-5
- wrapping head
- Region region-6
- dispatch chute
Label 1: intake hopper — the upper-left module receives loose packets from a tote. Label 2: alignment belt — the upper-centre module separates and turns packets. Label 3: inspection camera — the upper-right module checks barcodes and seal lines. Label 4: buffer magazine — the lower-left module holds a short reserve of empty sleeves. Label 5: wrapping head — the lower-centre module folds a sleeve around the product and closes the seam. Label 6: dispatch chute — the lower-right module lowers sealed packs onto a tray or into a shipping crate. The remaining labels are not assigned to positions in the passage.
At the upper left, the intake hopper receives loose packets from a tote and releases them at a steady rate
Directly beside it, in the upper centre, the alignment belt separates overlapping items and turns each one so that its printed face points forward
Once sealed, packs slide to the lower right dispatch chute, which lowers them onto a tray or into a shipping crate
What to review next
Find the words that support each answer. For a mistake, compare the question with the evidence and identify the detail or inference you missed.
A focused practice result shows how you did on these tasks. Use several activities across skills to decide what to study next; one practice score does not certify an overall CEFR level.
Before you practise: a worked example
Look for evidence in the text. Separate what the writer says from what you already know about the topic.
The library normally closes at six, but on Fridays it stays open until eight. When does it close on Friday?
The answer is eight. But introduces an exception to the normal closing time, so the first time mentioned is not the answer.
This teaching example is separate from the scored questions. After your test, compare any mistakes with the explanation and revisit the topic before trying again.